Nowadays, solar street lights are increasingly found in both urban and rural areas, becoming a widely used lighting device along our roads. They greatly assist in our nighttime travel. How should solar street lights be installed? Below, we provide a detailed introduction.
1. Site Selection
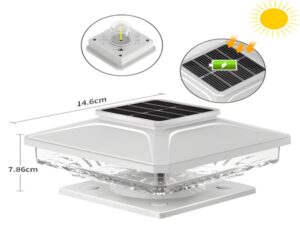
1. Choose the orientation of the light source based on the road direction and the position of the light fixture. Adjust the angle of the solar panel according to the local latitude to ensure adequate illumination coverage on the road surface.
2. Solar street lights must be installed in well-lit areas without any shadows obstructing the solar panels throughout the day. In the Northern Hemisphere, the panels should face south; in the Southern Hemisphere, the opposite applies, with the panels facing north. Near the equator, panels can be laid flat.
3. Solar fixtures should be kept away from heat sources to prevent damage and extend their lifespan.
4. Operating temperature range: -20℃ to 60℃. In colder environments, system configurations may need to be adjusted for temperature protection.
5. Direct light sources should not fall on the solar panels to avoid misconfigurations in the control system.
2. Foundation
1. Foundation Installation
Foundation Pit:
Survey the site conditions. If the soil is hard, excavate a pit of about 1 cubic meter for the installation location (adjust based on the height of the pole). For soft soil or special requirements, determine the excavation depth accordingly.
3. Installation
First Step: Inspection and Testing
1. Check whether all components are complete.
2. Test whether the fixtures operate normally. If the light operates correctly in demonstration mode, it is functioning well. Once testing is complete, adjust the settings using the remote.
Second Step: Assembling the Lamp Head Component (for specific models)
1. Remove the three screws securing the top cover and secure the top cover in place.
2. Use six screws from the accessory bag to secure the mounting bracket to the solar panel.
3. Pre-adjust the angle of the solar panel and assemble it with the lamp head.
4. Ensure a secure connection between the solar panel assembly and the support.
5. Keep the output wires of the assembly protected and secure them with cable ties.
6. The solar panel should be oriented true south, verified with a compass.
Note: The anti-slip screws must be tightened.
Third Step: Assembling the Lamp Head and Pole
1. Install the lamp head, with the solar panel already attached, onto the pole.
Note: The diameter at the top of the pole is 60-70MM, depending on the fixture’s requirements.
2. Tighten the six screws locking the pole in place.
3. Installation is complete.
This concludes the information on solar street light installation. Proper installation is crucial for the effective operation of our solar street lights, ensuring they provide bright illumination at night. Professional installation is recommended for optimal results, and this knowledge is simply for your awareness.